


How do I change the Starlink Wi-Fi network name and password?
- Connect your mobile device to the STARLINK or STINKY Wi-Fi network (no password). If you do not see this network, reset the Starlink router (see FAQ below).

- Open a web browser and go to 192.168.1.1. You should see “Starlink Create Network.”

- Enter a new name (SSID) and password for the Starlink Wi-Fi network.

- Select CREATE. A confirmation screen should appear.

- You can now connect your mobile device to the renamed Wi-Fi network and enter your new password for access.


How do I factory reset my Starlink router?
Gen 3 Router
Remove the rubber cover protecting the Ethernet ports on the rear panel. Then, using a paper clip (or equivalent), press and hold the Reset button located between the two Ethernet ports for 2-3 seconds. The light on the front of the router will blink fast for a few seconds then blink slowly for a couple minutes while the router initializes.

Gen 2 Router
Cycle power (unplug then plug back in the AC power cord) on the router six times in a row. Allow 2-3 seconds between power cycles. The router will take a few minutes to reboot; your service will be interrupted during this process. The light on the bottom of the router will illuminate when complete.

Starlink Mini Built-in Router
Press and hold the Reset button on the bottom of the Starlink Mini antenna for at least 3 seconds. The status light on the bottom of the antenna will blink quickly while you are pressing the button then turn off as it reboots.

How can I set up bypass mode on my Starlink?
- Connect your mobile device to the STARLINK or STINKY Wi-Fi network (no password). If you don’t see this network, reset the router (see previous FAQ above).

Note: As an alternative to Wi-Fi, you can use a laptop connected directly to the Starlink router with an Ethernet cable (for a Gen 2 router, connect via the Ethernet adapter). - Open a web browser and go to 192.168.1.1. You should see “Starlink Create Network.”
- Select Enable Router Bypass Mode.

- Select Confirm.

- When you see the “Goodbye” message, you can close your browser. The Starlink router is now in Bypass mode.


Note: Your Starlink system should be tested as a standalone system before enabling Bypass mode and connecting it to either a KVH or other third-party device.
I’m accustomed to using my Starlink app and am now using KVH Manager. What information is available for my Starlink system in KVH Manager?
How should I decide whether or not to opt-in for priority data?
Your Priority Data will be used first, regardless of the terminal’s location. Once your Priority Data allowance for the month is consumed, the following two scenarios apply:
- If OPTED IN for Priority Data: Global Priority overage rates per GB will be incurred and your Global Priority data will continue. Local Priority subscribers will be charged for recurring 50 GB Top-Up blocks.
- If OPTED OUT for Priority Data: Free unlimited data at up to 1/0.5 Mbps (down/up) with the same coverage areas as Priority Data.
IMPORTANT!
Internet connectivity in ocean areas is available only for Global Priority data. If you have consumed your monthly data allotment, and you are Opted Out for Priority Data you will receive the free unlimted data at up to 1/0.5 Mbps (down/up), even in ocean areas. The black areas on the map at starlink.com/map indicate ocean areas. To Opt-In or Opt-Out of additional Priority data, move the toggle on the Data Usage page in KVH Manager (see below), or contact KVH at airtimeservices@kvh.com.

How do I suspend service or change plans on my Starlink terminal?
How will I be billed for my Starlink service?
Who do I contact if I have a technical issue with my Starlink?
Is it possible to combine two Starlinks to boost my performance?

With KVH’s CommBox Edge you can certainly integrate two Starlink antennas to boost your performance. The CommBox Edge Communications Gateway offers a powerful onboard addition to your vessel’s infrastructure by integrating and managing all onboard connectivity.
Is it possible to give guests onboard different levels of internet access (limited access to some and full data usage to others)?
Yes! With KVH’s CommBox Edge you can create versatile user data rules and quotas to granularly control your data. The CommBox Edge Communications Gateway offers a powerful onboard addition to your vessel’s infrastructure by integrating and managing all onboard connectivity.
The Starlink App says my Starlink Standard or Starlink Mini is misaligned. What should I do?
My Starlink terminal is non-functional after 1 December 2025. How do I restore service?
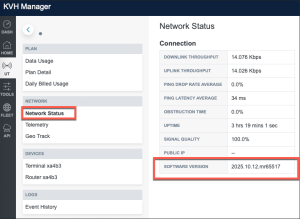
How do I confirm my Starlink terminal’s software version using KVH Manager or the Starlink app?
The easiest way to verify your Starlink terminal’s software version is to log into KVH Manager via myKVH and check your Starlink terminal’s network status. Please note – this information will only be visible in KVH Manager if your Starlink terminal has an active account:
Alternatively, connect to your Starlink Wi-Fi network and open the Starlink app. While login is not required, the app will only work for this if your Starlink terminal is connected to a Starlink router. To check software version using Starlink App:
- Connect your Android or iPhone device to the Starlink Wi-Fi network (if new and not setup yet, this will show as “STARLINK”)
- Now open the Starlink app on your device (the app must already be loaded on your device)
- The Starlink app should now see the Starlink terminal and connect to it, showing the status of system
- Scroll to bottom of the home screen and find “Advanced” in the bottom right corner of page, then click “Advanced.”
- Now the app will show the Starlink Terminal and Starlink Router Info including software versions for each. a. If the version of Starlink terminal shows 2025.xx.xx.mrxxx, your system is up to date. (Example 2025.10.31.mr66772 or similar) b. If your software version is earlier than 2025, it will need to be updated as described in our FAQ, “How do I manually update my Starlink terminal software?”